


You can add a language selector to a website in two ways. Build it yourself as a list of links to each language version of the current page, or use a website translation tool that adds a switcher you can configure. Whichever you choose, the selector should appear on every page and label each language in that language (Deutsch, Español, Français). It should also keep the visitor on the same page when they switch, and let people choose rather than redirecting them.
Both methods are below, step by step, with code you can copy and the design rules W3C and Google recommend.
Key takeaways
- A language selector should link to a real, separate URL for each language instead of swapping text with a script. Separate URLs are what let search engines index every version.
- Label languages by their own names (“Deutsch”, not “German”) and do not rely on flags alone. W3C advises against using country flags to identify languages.
- Put the selector in the same place on every page, usually the header or a fixed corner, and keep visitors on the equivalent page when they switch.
- Do not force visitors into a language by IP address or browser settings. Google recommends against automatic redirects between language versions and suggests linking them instead.
- Translation tools such as ConveyThis add the selector automatically and let you style it (flags, labels, position, colours) without code.
What makes a good language selector
These rules come from the W3C internationalization guidance and Google’s documentation on multilingual sites:
- Put it on every page. W3C says: “It is always best to add links to alternate language versions, and to do so on every page” (W3C).
- Name each language in its own language. A German speaker scanning an English page looks for “Deutsch”, not “German.” W3C recommends that links be “in the language of the page they point to.”
- Treat flags as optional decoration, never as the label. W3C says: “Resist the temptation to use country flags to identify languages. Some countries have more than one language, and some languages are spoken in more than one country.” If you use flags for style, always show the language name next to them.
- Keep the visitor on the same page. Switching to Spanish from
/pricingshould land on/es/pricing, not on the Spanish homepage. - Do not force redirects. Google advises: “Avoid automatically redirecting users from one language version of a site to a different language version of a site,” and suggests adding hyperlinks to other language versions instead (Google Search Central). If you want to suggest a language based on the browser, use a banner the visitor can dismiss instead of a redirect.
- Make it easy to find and use. Put it somewhere familiar (top right of the header, or the footer on content-heavy sites), make it big enough to tap on a phone, and make sure it works with a keyboard.
Method 1: build the language selector yourself
Use this if you manage your own HTML or theme and each language already has its own URL.
Step 1: make sure every language has its own URL
A selector links between versions, so the versions have to exist first: example.com/about, example.com/de/about, example.com/es/about. If you are still choosing a structure, see subdirectories vs subdomains for multilingual SEO.
Step 2: add the selector markup
The simplest accessible selector is a list of links. Each link says which language it leads to (hreflang) and what language its text is in (lang):
<nav aria-label="Language">
  <ul class="lang-switcher">
    <li><a href="/about" hreflang="en" lang="en" aria-current="true">English</a></li>
    <li><a href="/de/about" hreflang="de" lang="de">Deutsch</a></li>
    <li><a href="/es/about" hreflang="es" lang="es">Español</a></li>
    <li><a href="/fr/about" hreflang="fr" lang="fr">Français</a></li>
  </ul>
</nav>
This markup works for three reasons:
- Plain links are crawlable, so search engines discover every language version.
langon each link lets screen readers pronounce “Deutsch” correctly.aria-currentmarks the language the visitor is reading now.
With more than about five languages, a dropdown saves space. Use a button that opens the list rather than a <select> that navigates on change, which is awkward for keyboard users.
Step 3: generate the links for the current page
Each link has to point to the current page in the other language. In a CMS, this usually comes from your multilingual plugin or template variables. On a static site, generate the list at build time from a map of equivalent URLs. Do not hard-code links to each language’s homepage.
Step 4: add hreflang tags in the page head
The visible selector is for people. Search engines also need <link rel="alternate" hreflang="…"> tags in the <head> of every page, listing every language version including the page itself, plus an x-default. Our complete hreflang guide shows the exact markup.
Step 5: test
- Switch languages from a deep page (not the homepage) and confirm you land on the equivalent page.
- Tab to the selector with the keyboard and open it without a mouse.
- Check it on a phone and make sure you can tap each language easily.
- View source on a translated page and confirm the hreflang tags are there.
You get full control over design and behaviour. The cost is that you maintain the URL mapping, the hreflang tags and the translations yourself.
Method 2: use a website translation tool’s selector
A translation tool creates the language versions, their URLs, the hreflang tags and the selector together, which keeps all of them in sync. With ConveyThis, the switcher is added when you install the plugin, app or script, and you customise it from the dashboard settings without writing code.
These are the settings you can change:
| Setting | Options |
|---|---|
| Flag style | Rectangle, square or circle flags, or no flag at all |
| Language label | Full name in English (“Spanish”), full name in the language itself (“Español”), or the two-letter code (“ES”) |
| Position | A fixed corner of the page, or inside any element on your page (you give the element’s ID, for example a spot in your header) |
| Menu direction | Whether the list opens upward or downward, or automatically |
| Look | Background, text, border and hover colours; rounded or square corners |
| Which flag represents a language | For example a UK or Australian flag instead of the US flag for English (how to change a flag) |
To follow the best practices above with ConveyThis:
- Set the label to the language’s native name. Keep flags as a visual extra, or turn them off.
- Place the switcher inside your header by giving the ID of the element where it should appear, so it sits where visitors expect it.
- Leave the optional automatic redirect by browser language switched off unless you have a strong reason to use it. The dashboard itself warns that search engine crawlers may follow such redirects.
- Pick a URL structure (subfolders, subdomains or
?lang; second-level domains on the Extreme plan). Hreflang tags are added automatically.
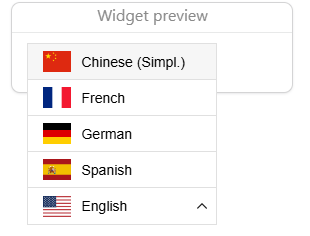
Read more about the current design in meet the new language switcher, or see the platform guides for WordPress and Shopify.
You write no code, the selector, URLs and hreflang stay in sync automatically, and it works on most platforms. You do get less control over the markup than with a fully custom build, although you can still place and style the switcher.
Which method should you choose?
| If you… | Choose |
|---|---|
| Already have translated pages and a developer | Method 1: build it yourself |
| Need the translations as well as the selector | Method 2: a translation tool |
| Run WordPress, Shopify, Wix, Webflow or a similar platform | Method 2, via the platform’s plugin or app |
| Need a very specific design | Method 1, or Method 2 placed inside your own header element and styled to match |
Common language selector mistakes
- Using flags only. Does the Spanish flag mean Spain, Mexico or Argentina? Is the Swiss flag German, French or Italian? Always add a label.
- Listing languages in English only. A Japanese visitor may not recognise the word “Japanese”.
- Dropping visitors on the homepage after they switch.
- Hiding the selector in a hamburger menu on desktop, or behind a tiny icon.
- Redirecting automatically by IP or browser language, with no way back.
- Switching languages by script alone, with no separate URLs, so search engines see only one language.
Frequently asked questions
Where should a language selector go? Most sites put it at the top right of the header, where visitors expect it. Content-heavy sites often repeat it in the footer. Keep it in the same place on every page.
Should I use flags in my language switcher? Only alongside language names. Flags represent countries, not languages, so on their own they confuse visitors in multilingual countries and speakers of widely spoken languages.
Should my website switch language automatically based on the browser? Better not to force it. Google recommends against automatic redirects between language versions. If you want to help visitors, show a suggestion they can accept or dismiss, and always keep the selector visible.
Does a language selector help SEO? The selector itself helps search engines discover your language versions through crawlable links. Rankings in each language depend on having separate URLs, hreflang tags and translated metadata.
To get a switcher, translated pages and hreflang set up together, try ConveyThis free. Plans are on the pricing page.












;fill-opacity:1;'%20d='M%2019.511719%2039.964844%20C%208.304688%2039.964844%200%2031.289062%200%2020.324219%20L%200%2020.230469%20C%200%209.363281%208.160156%200.46875%2019.847656%200.46875%20C%2027.023438%200.46875%2031.320312%202.878906%2034.847656%206.375%20L%2029.519531%2012.492188%20C%2026.59375%209.820312%2023.59375%208.179688%2019.800781%208.179688%20C%2013.390625%208.179688%208.761719%2013.53125%208.761719%2020.085938%20L%208.761719%2020.203125%20C%208.761719%2026.757812%2013.273438%2032.203125%2019.800781%2032.203125%20C%2024.144531%2032.203125%2026.808594%2030.46875%2029.808594%2027.722656%20L%2035.136719%2033.121094%20C%2031.199219%2037.335938%2026.855469%2039.964844%2019.511719%2039.964844%20'/%3e%3cpath%20style='%20stroke:none;fill-rule:nonzero;fill:rgb(26.274511%25,42.352942%25,94.901961%25);fill-opacity:1;'%20d='M%2035.878906%200.0351562%20L%2044.136719%200.0351562%20L%2044.136719%2039.867188%20L%2035.878906%2039.867188%20Z%20M%2035.878906%200.0351562%20'/%3e%3cpath%20style='%20stroke:none;fill-rule:nonzero;fill:rgb(26.274511%25,42.352942%25,94.901961%25);fill-opacity:1;'%20d='M%2059.472656%2016.15625%20C%2056.039062%2016.15625%2053.808594%2018.613281%2053.160156%2022.375%20L%2065.617188%2022.375%20C%2065.113281%2018.664062%2062.953125%2016.15625%2059.472656%2016.15625%20M%2073.535156%2027.578125%20L%2053.28125%2027.578125%20C%2054.097656%2031.335938%2056.710938%2033.3125%2060.40625%2033.3125%20C%2063.191406%2033.3125%2065.183594%2032.445312%2067.464844%2030.300781%20L%2072.191406%2034.492188%20C%2069.480469%2037.867188%2065.566406%2039.941406%2060.289062%2039.941406%20C%2051.527344%2039.941406%2045.070312%2033.769531%2045.070312%2024.832031%20L%2045.070312%2024.710938%20C%2045.070312%2016.347656%2051%209.480469%2059.472656%209.480469%20C%2069.191406%209.480469%2073.65625%2017.074219%2073.65625%2025.363281%20L%2073.65625%2025.457031%20C%2073.65625%2026.300781%2073.609375%2026.808594%2073.535156%2027.578125%20'/%3e%3cpath%20style='%20stroke:none;fill-rule:nonzero;fill:rgb(26.274511%25,42.352942%25,94.901961%25);fill-opacity:1;'%20d='M%2089.375%2039.796875%20L%2081.863281%2039.796875%20L%2070.390625%2010.324219%20L%2079.152344%2010.324219%20L%2085.679688%2029.914062%20L%2092.257812%2010.324219%20L%20100.847656%2010.324219%20Z%20M%2089.375%2039.796875%20'/%3e%3cpath%20style='%20stroke:none;fill-rule:nonzero;fill:rgb(26.274511%25,42.352942%25,94.901961%25);fill-opacity:1;'%20d='M%20111.550781%2016.15625%20C%20108.121094%2016.15625%20105.886719%2018.613281%20105.238281%2022.375%20L%20117.695312%2022.375%20C%20117.191406%2018.664062%20115.03125%2016.15625%20111.550781%2016.15625%20M%20125.617188%2027.578125%20L%20105.359375%2027.578125%20C%20106.175781%2031.335938%20108.792969%2033.3125%20112.488281%2033.3125%20C%20115.246094%2033.3125%20117.265625%2032.445312%20119.542969%2030.300781%20L%20124.273438%2034.492188%20C%20121.558594%2037.867188%20117.648438%2039.941406%20112.367188%2039.941406%20C%20103.609375%2039.941406%2097.152344%2033.769531%2097.152344%2024.832031%20L%2097.152344%2024.710938%20C%2097.152344%2016.347656%20103.078125%209.480469%20111.550781%209.480469%20C%20121.273438%209.480469%20125.734375%2017.074219%20125.734375%2025.363281%20L%20125.734375%2025.457031%20C%20125.734375%2026.300781%20125.6875%2026.808594%20125.617188%2027.578125%20'/%3e%3cpath%20style='%20stroke:none;fill-rule:nonzero;fill:rgb(26.274511%25,42.352942%25,94.901961%25);fill-opacity:1;'%20d='M%20143.566406%2018.757812%20C%20138.070312%2018.757812%20134.710938%2022.085938%20134.710938%2029.074219%20L%20134.710938%2039.867188%20L%20126.457031%2039.867188%20L%20126.457031%2010.613281%20L%20134.710938%2010.613281%20L%20134.710938%2016.519531%20C%20136.390625%2012.46875%20139.128906%209.867188%20144%2010.085938%20L%20144%2018.757812%20Z%20M%20143.566406%2018.757812%20'/%3e%3c/g%3e%3c/svg%3e)




;fill-opacity:1;'%20d='M%20144.558594%2039.894531%20L%20155.4375%209.839844%20C%20155.4375%209.839844%20147.28125%209.839844%20139.121094%2011.515625%20L%20128.867188%2039.894531%20Z%20M%20142.675781%201.78125%20L%20140.585938%207.539062%20C%20148.738281%205.863281%20156.902344%205.863281%20156.902344%205.863281%20L%20158.992188%200.105469%20C%20158.992188%200.105469%20150.832031%200.105469%20142.675781%201.78125%20M%2085.980469%2032.773438%20C%2090.898438%2033.71875%2095.914062%2034.136719%20101.039062%2034.136719%20C%20106.375%2034.136719%20110.140625%2032.984375%20110.554688%2029.320312%20C%20110.765625%2027.640625%20109.089844%2026.382812%20106.167969%2024.707031%20C%20102.816406%2022.824219%2099.894531%2021.878906%2096.960938%2019.886719%20C%2094.03125%2017.898438%2092.78125%2014.859375%2093.71875%2011.507812%20C%2094.871094%207.636719%2097.585938%205.4375%20101.664062%203.34375%20C%20106.480469%200.9375%20110.242188%20-0.0078125%20119.550781%20-0.0078125%20C%20125.40625%20-0.0078125%20131.054688%200.515625%20136.597656%201.667969%20L%20134.609375%207.113281%20C%20129.691406%206.167969%20124.675781%205.75%20119.550781%205.75%20C%20114.214844%205.75%20110.453125%206.90625%20110.035156%2010.570312%20C%20109.828125%2012.246094%20111.5%2013.503906%20114.425781%2015.179688%20C%20117.773438%2017.066406%20120.695312%2018.011719%20123.628906%2020%20C%20126.558594%2021.988281%20127.808594%2025.027344%20126.871094%2028.378906%20C%20125.71875%2032.253906%20123.003906%2034.449219%20118.925781%2036.542969%20C%20114.113281%2038.949219%20110.347656%2039.894531%20101.039062%2039.894531%20C%2095.183594%2039.894531%2089.535156%2039.375%2083.992188%2038.21875%20Z%20M%2062.34375%2039.894531%20L%2071.441406%2014.867188%20C%2074.476562%206.488281%2063.390625%209.527344%2060.875%2011.515625%20C%2058.890625%2012.984375%2055.332031%2016.441406%2054.078125%2020.105469%20L%2046.859375%2040%20L%2031.175781%2040%20L%2040.273438%2014.867188%20C%2043.308594%206.488281%2032.222656%209.527344%2029.710938%2011.515625%20C%2027.722656%2012.984375%2024.167969%2016.441406%2022.910156%2020.105469%20L%2015.691406%2040%20L%200.0078125%2040%20L%2014.441406%200.105469%20C%2019.464844%200.105469%2022.179688%201.257812%2024.375%203.457031%20C%2025.207031%204.289062%2025.734375%205.339844%2026.046875%206.496094%20C%2028.980469%204.714844%2031.589844%203.351562%2033.371094%202.726562%20C%2036.613281%201.46875%2040.691406%200.105469%2045.714844%200.105469%20C%2050.734375%200.105469%2053.453125%201.257812%2055.644531%203.457031%20C%2056.480469%204.289062%2057.007812%205.339844%2057.320312%206.496094%20C%2060.25%204.714844%2062.863281%203.351562%2064.640625%202.726562%20C%2067.886719%201.46875%2071.964844%200.113281%2076.984375%200.113281%20C%2082.007812%200.113281%2084.722656%201.265625%2086.917969%203.464844%20C%2089.21875%205.660156%2089.113281%209.742188%2088.28125%2012.050781%20L%2078.027344%2039.902344%20L%2062.34375%2039.902344%20Z%20M%2062.34375%2039.894531%20'/%3e%3c/g%3e%3c/svg%3e)

;fill-opacity:1;'%20d='M%202.453125%209.882812%20L%202.453125%2012.851562%20L%207.304688%2012.851562%20L%2016.800781%2030.734375%20L%2028.488281%2030.734375%20L%2037.980469%2012.824219%20L%2042.832031%2012.792969%20L%2042.84375%209.882812%20L%2028.328125%209.882812%20L%2028.328125%2012.804688%20L%2032.195312%2012.804688%20L%2025.488281%2025.515625%20L%2018.234375%2012.847656%20L%2023.527344%2012.824219%20L%2023.515625%209.882812%20Z%20M%2096.097656%209.882812%20L%2096.097656%2012.851562%20L%20100.949219%2012.851562%20L%20110.445312%2030.734375%20L%20122.128906%2030.734375%20L%20131.625%2012.824219%20L%20136.476562%2012.792969%20L%20136.484375%209.882812%20L%20121.972656%209.882812%20L%20121.972656%2012.804688%20L%20125.835938%2012.804688%20L%20119.132812%2025.515625%20L%20111.878906%2012.847656%20L%20117.167969%2012.824219%20L%20117.160156%209.882812%20Z%20M%2072.222656%209.882812%20L%2072.222656%2012.851562%20L%2077.078125%2012.851562%20L%2077.082031%2027.453125%20L%2071.96875%2027.453125%20L%2071.96875%2030.707031%20L%2077.085938%2030.734375%20L%20101.3125%2030.734375%20L%20101.3125%2021.027344%20L%2098.15625%2021.027344%20C%2097.984375%2026.167969%2093.542969%2027.457031%2091.675781%2027.457031%20C%2089.960938%2027.457031%2086.640625%2027.453125%2086.640625%2027.453125%20L%2086.640625%2012.847656%20L%2091.417969%2012.824219%20L%2091.410156%209.882812%20Z%20M%2055.890625%209.285156%20C%2047.644531%209.285156%2040.960938%2014.214844%2040.960938%2020.292969%20C%2040.960938%2026.375%2047.644531%2031.304688%2055.890625%2031.304688%20C%2064.136719%2031.304688%2070.824219%2026.375%2070.824219%2020.292969%20C%2070.824219%2014.214844%2064.136719%209.285156%2055.890625%209.285156%20Z%20M%2055.675781%2028.0625%20C%2052.769531%2028.0625%2050.414062%2024.566406%2050.414062%2020.25%20C%2050.414062%2015.933594%2052.769531%2012.4375%2055.675781%2012.4375%20C%2058.582031%2012.4375%2060.941406%2015.933594%2060.941406%2020.25%20C%2060.941406%2024.566406%2058.582031%2028.0625%2055.675781%2028.0625%20Z%20M%20149.539062%208.921875%20C%20141.289062%208.921875%20134.605469%2013.933594%20134.605469%2020.113281%20C%20134.605469%2026.292969%20141.289062%2031.300781%20149.539062%2031.300781%20C%20157.78125%2031.300781%20164.46875%2026.292969%20164.46875%2020.113281%20C%20164.46875%2013.933594%20157.78125%208.921875%20149.539062%208.921875%20Z%20M%20149.324219%2028.007812%20C%20146.417969%2028.007812%20144.0625%2024.453125%20144.0625%2020.066406%20C%20144.0625%2015.679688%20146.417969%2012.125%20149.324219%2012.125%20C%20152.230469%2012.125%20154.585938%2015.679688%20154.585938%2020.066406%20C%20154.585938%2024.453125%20152.230469%2028.007812%20149.324219%2028.007812%20Z%20M%20149.324219%2028.007812%20'/%3e%3c/g%3e%3c/svg%3e)